Next.js
Building Forms with Next.js
A web form has a client-server relationship. They are used to send data handled by a web server for processing and storage. The form itself is the client, and the server is any storage mechanism that can be used to store, retrieve and send data when needed.
This guide will teach you how to create a web form with Next.js.
Part 1: HTML Form
HTML forms are built using the <form> tag. It takes a set of attributes and fields to structure the form for features like text fields, checkboxes, dropdown menus, buttons, radio buttons, etc.
Here's the syntax of a HTML form:
<!-- Basic HTML Form -->
<form action="/send-data-here" method="post">
  <label for="first">First name:</label>
  <input type="text" id="first" name="first" />
  <label for="last">Last name:</label>
  <input type="text" id="last" name="last" />
  <button type="submit">Submit</button>
</form>
The front-end looks like this:
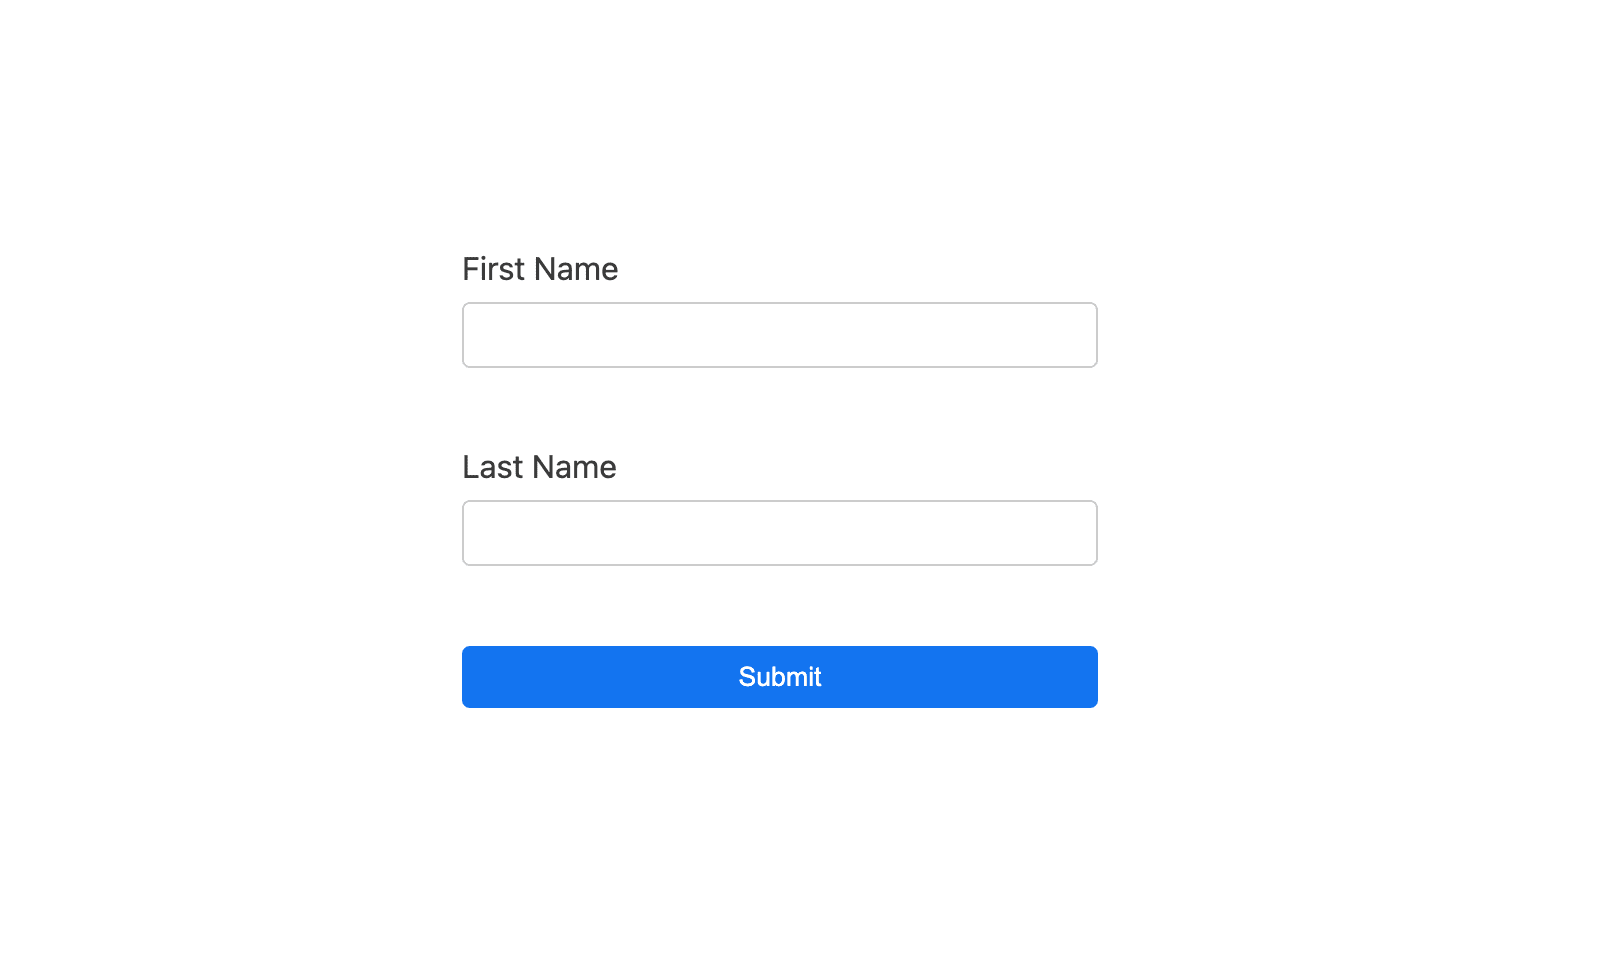
The HTML <form> tag acts as a container for different <input> elements like text field and submit button. Let's study each of these elements:
action: An attribute that specifies where the form data is sent when the form is submitted. It's generally a URL (an absolute URL or a relative URL).method: Specifies the HTTP method, i.e.,GETorPOSTused to send data while submitting the form.<label>: An element that defines the label for other form elements. Labels aid accessibility, especially for screen readers.<input>: The form element that is widely used to structure the form fields. It depends significantly on the value of thetypeattribute. Input types can betext,checkbox,email,radio, and more.<button>: Represents a clickable button that's used to submit the form data.
Form Validation
A process that checks if the information provided by a user is correct or not. Form validation also ensures that the provided information is in the correct format (e.g. there's an @ in the email field). These are of two types:
- Client-side: Validation is done in the browser
- Server-side: Validation is done on the server
Though both of these types are equally important, this guide will focus on client-side validation only.
Client-side validation is further categorized as:
- Built-in: Uses HTML-based attributes like
required,type,minLength,maxLength,pattern, etc. - JavaScript-based: Validation that's coded with JavaScript.
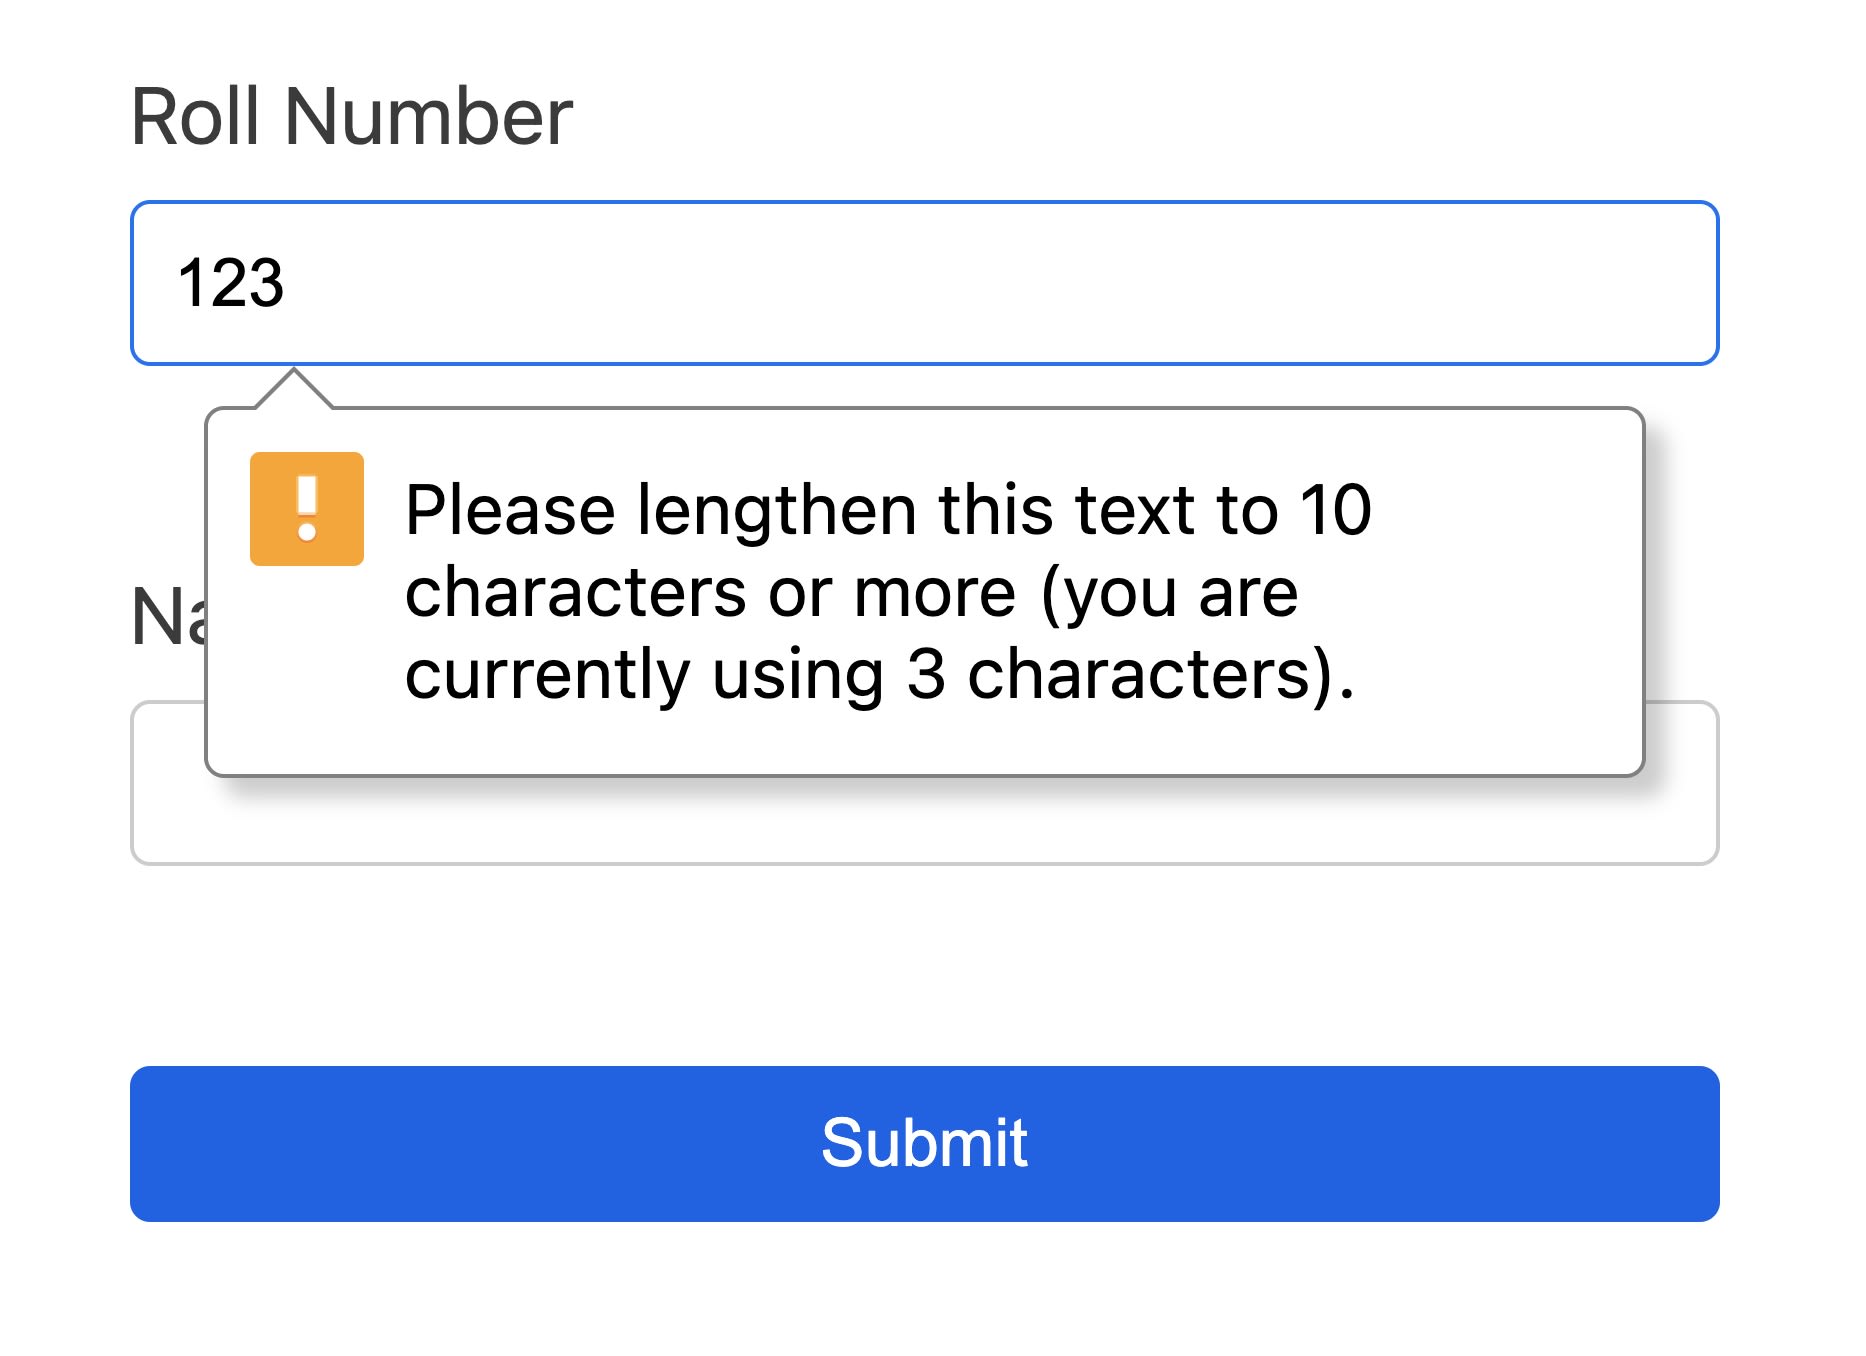
Built-in Form Validation Using required, type, minLength, maxLength
required: Specifies which fields must be filled before submitting the form.type: Specifies the data's type (i.e a number, email address, string, etc).minLength: Specifies minimum length for the text data string.maxLength: Specifies maximum length for the text data string.
So, a form using this attributes may look like:
<!-- HTML Form with Built-in Validation -->
<form action="/send-data-here" method="post">
  <label for="roll">Roll Number</label>
  <input
    type="text"
    id="roll"
    name="roll"
    required
    minlength="10"
    maxlength="20"
  />
  <label for="name">Name:</label>
  <input type="text" id="name" name="name" required />
  <button type="submit">Submit</button>
</form>
With these validation checks in place, when a user tries to submit an empty field for Name, it gives an error that pops right in the form field. Similarly, a roll number can only be entered if it's 10-20 characters long.
JavaScript-based Form Validation
Form Validation is important to ensure that a user has submitted the correct data, in a correct format. JavaScript offers an additional level of validation along with HTML native form attributes on the client side. Developers generally prefer validating form data through JavaScript because its data processing is faster when compared to server-side validation, however front-end validation may be less secure in some scenarios as a malicious user could always send malformed data to your server.
The following example shows using JavaScript to validate a form:
<form onsubmit="validateFormWithJS()">
<label for="rollNumber">Roll Number:</label>
<input type="text" name="rollNumber" id="rollNumber" />
<label for="name">Name:</label>
<input type="text" name="name" id="name" />
<button type="submit">Submit</button>
</form>
<script>
function validateFormWithJS() {
const name = document.querySelector('#name').value
const rollNumber = document.querySelector('#rollNumber').value
if (!name) {
alert('Please enter your name.')
return false
}
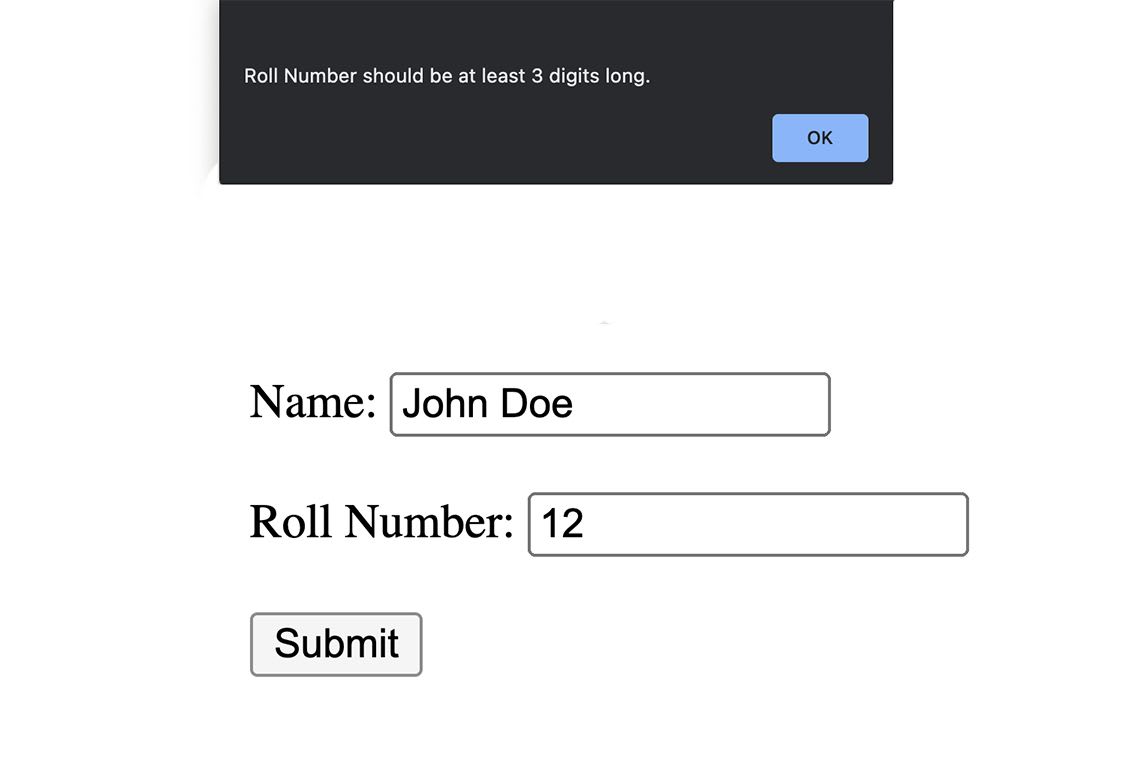
if (rollNumber.length < 3) {
alert('Roll Number should be at least 3 digits long.')
return false
}
}
</script>
The HTML script tag is used to embed any client-side JavaScript. It can either contain inline scripting statements (as shown in the example above) or point to an external script file via the src attribute.
This example validates the name and roll number of a user. The validateFormWithJS() function does not allow an empty name field, and the roll number must be at least three digits long. The validation is performed when you hit the Submit button. You are not redirected to the next page until the given values are correct.
Form Validation Using Regular Expressions
JavaScript validation with Regular Expressions uses the pattern HTML attribute. A regular expression (commonly known as RegEx) is an object that describes a pattern of characters. You can only apply the pattern attribute to the <input> element. This way, you can validate the input value using Regular Expressions (RegEx) by defining your own rules. Once again, if the value does not match the defined pattern, the input will give an error.
The below example shows using the pattern attribute on an input element:
<form action="/action_page.php">
<label for="pswrd">Password:</label>
<input
type="password"
id="pswrd"
name="pswrd"
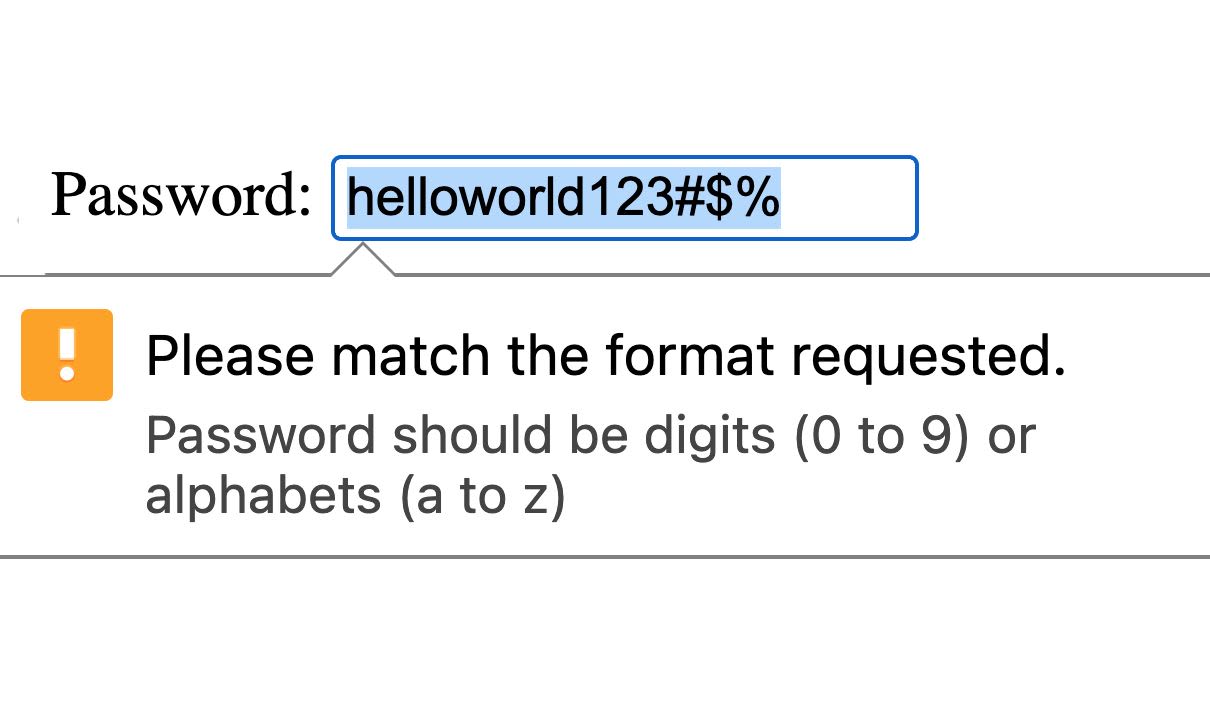
pattern="[a-z]{0,9}"
title="Password should be digits (0 to 9) or alphabets (a to z)."
/>
<button type="submit">Submit</button>
</form>
The password form field must only contain digits (0 to 9), lowercase alphabets (a to z) and it must be no more than 15 characters in length. No other characters (#,$,&, etc.) are allowed. The rule in RegEx is written as [a-z0-9]{1,15}.
To learn more about HTML forms, check out the MDN Web Docs.
Part 2: Project Setup
In the following section you will be creating forms in React using Next.js.
Create a new Next.js app. You can use the create-next-app for a quick start. In your command line terminal, run the following:
npx create-next-app
Answer the questions to create your project, and give it a name, this example uses next-forms. Next cd into this directory, and run npm run dev or yarn dev command to start the development server.
Open the URL printed in the terminal to ensure that your app is running successfully.
Part 3: Setting up a Next.js Form API Route
Both the client and the server will be built using Next.js. For the server part, create an API endpoint where you will send the form data.
Next.js offers a file-based system for routing that's built on the concept of pages. Any file inside the folder pages/api is mapped to /api/* and will be treated as an API endpoint instead of a page. This API endpoint is going to be server-side only.
Go to pages/api, create a file called form.js and paste this code written in Node.js:
export default function handler(req, res) {
  // Get data submitted in request's body.
  const body = req.body

  // Optional logging to see the responses
  // in the command line where next.js app is running.
  console.log('body: ', body)

  // Guard clause checks for first and last name,
  // and returns early if they are not found
  if (!body.first || !body.last) {
    // Sends a HTTP bad request error code
    return res.status(400).json({ data: 'First or last name not found' })
  }

  // Found the name.
  // Sends a HTTP success code
  res.status(200).json({ data: `${body.first} ${body.last}` })
}
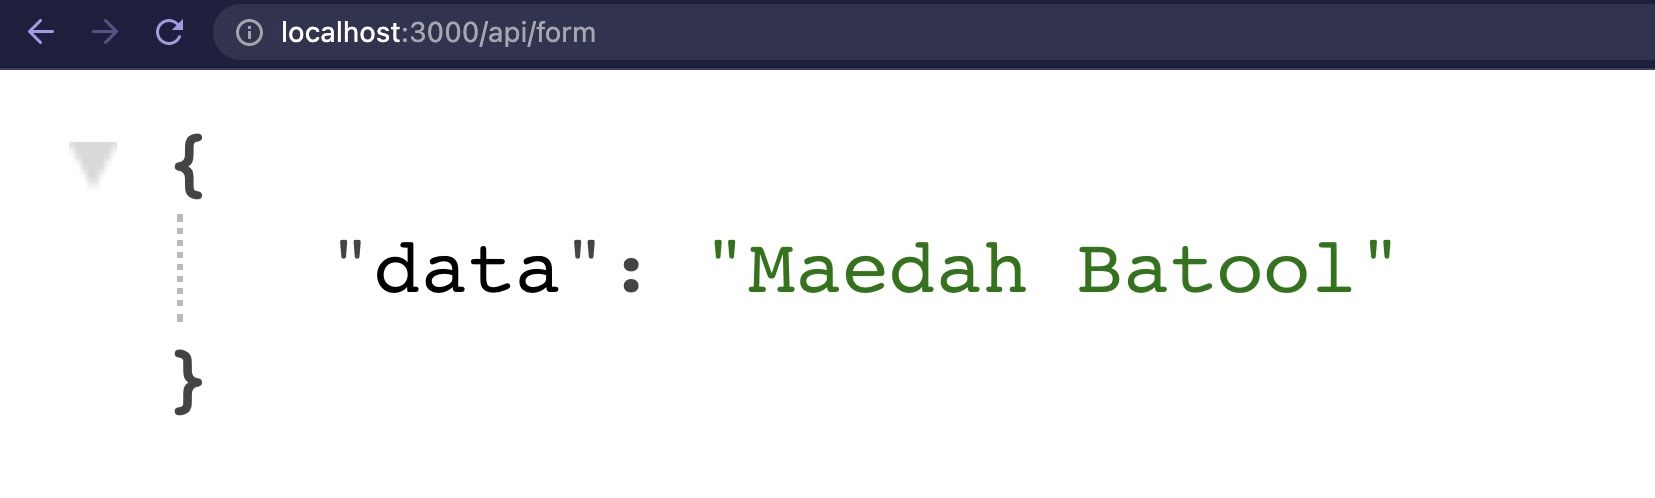
This form handler function will receive the request req from the client (i.e. submitted form data). And in return, it'll send a response res as JSON that will have both the first and the last name. You can access this API endpoint at http://localhost:3000/api/form or replace the localhost URL with an actual Vercel deployment when you deploy.
Moreover, you can also attach this API to a database like MongoDB or Google Sheets. This way, your submitted form data will be securely stored for later use. For this guide, no database is used. Instead, the same data is returned to the user to demo how it's done.
Form Submission without JavaScript
You can now use /api/form relative endpoint inside the action attribute of the form. You are sending form data to the server when the form is submitted via POST HTTP method (which is used to send data).
<form action="/api/form" method="post">
  <label for="first">First name:</label>
  <input type="text" id="first" name="first" />
  <label for="last">Last name:</label>
  <input type="text" id="last" name="last" />
  <button type="submit">Submit</button>
</form>
If you submit this form, it will submit the data to the forms API endpoint /api/form. The server then responds, generally handling the data and loading the URL defined by the action attribute, causing a new page load. So in this case you'll be redirected to http://localhost:3000/api/form with the following response from the server.
Part 4: Configuring Forms in Next.js
You have created a Next.js API Route for form submission. Now it's time to configure the client (the form itself) inside Next.js using React. The first step will be extending your knowledge of HTML forms and converting it into React (using JSX).
Here's the same form in a React function component written using JSX.
export default function Form() {
  return (
    <form action="/api/form" method="post">
      <label htmlFor="first">First Name</label>
      <input type="text" id="first" name="first" required />

      <label htmlFor="last">Last Name</label>
      <input type="text" id="last" name="last" required />

      <button type="submit">Submit</button>
    </form>
  )
}
Here's what changed:
- The
forattribute is changed tohtmlFor. (Sinceforis a keyword associated with the "for" loop in JavaScript, React elements usehtmlForinstead.) - The
actionattribute now has a relative URL which is the form API endpoint.
This completes the basic structure of your Next.js-based form.
You can view the entire source code of next-forms example repo that we're creating here as a working example. Feel free to clone it and start right away. This demo is built with create-next-app, and you can preview the basic form CSS styles inside
/styles/global.cssfile.
Part 5: Form Submission without JavaScript
JavaScript brings interactivity to our web applications, but sometimes you need to control the JavaScript bundle from being too large, or your sites visitors might have JavaScript disabled.
There are several reasons why users disable JavaScript:
- Addressing bandwidth constraints
- Increasing device (phone or laptop) battery life
- For privacy so they won’t be tracked with analytical scripts
Regardless of the reason, disabling JavaScript will impact site functionality partially, if not completely.
Next open the next-forms directory. Inside the /pages directory, create a file no-js-form.js.
Quick Tip: In Next.js, a page is a React Component exported from a
.js,.jsx,.ts, or.tsxfile in the pages directory. Each page is associated with a route based on its file name.Example: If you create
pages/no-js-form.js, it will be accessible atyour-domain.tld/no-js-form.
Let's use the same code from above:
export default function PageWithoutJSbasedForm() {
  return (
    <form action="/api/form" method="post">
      <label htmlFor="first">First Name</label>
      <input type="text" id="first" name="first" required />

      <label htmlFor="last">Last Name</label>
      <input type="text" id="last" name="last" required />

      <button type="submit">Submit</button>
    </form>
  )
}
With JavaScript disabled, when you hit the Submit button, an event is triggered, which collects the form data and sends it to our forms API endpoint as defined in the action attribute and using POST HTTP method. You'll be redirected to the /api/form endpoint since that's how form action works.
The form data will be submitted on the server as a request req to the form handler function written above. It will process the data and return a JSON string as a response res with your submitted name included.
To improve the experience here, as a response you can redirect the user to a page and thank them for submitting the form.
Part 6: Form Submission with JavaScript Enabled
Inside /pages, you'll create another file called js-form.js. This will create a /js-form page on your Next.js app.
Now, as soon as the form is submitted, we prevent the form's default behavior of reloading the page. We'll take the form data, convert it to JSON string, and send it to our server, the API endpoint. Finally, our server will respond with the name submitted. All of this with a basic JavaScript handleSubmit() function.
Here's what this function looks like. It's well documented for you to understand each step:
export default function PageWithJSbasedForm() {
  // Handles the submit event on form submit.
  const handleSubmit = async (event) => {
    // Stop the form from submitting and refreshing the page.
    event.preventDefault()

    // Get data from the form.
    const data = {
      first: event.target.first.value,
      last: event.target.last.value,
    }

    // Send the data to the server in JSON format.
    const JSONdata = JSON.stringify(data)

    // API endpoint where we send form data.
    const endpoint = '/api/form'

    // Form the request for sending data to the server.
    const options = {
      // The method is POST because we are sending data.
      method: 'POST',
      // Tell the server we're sending JSON.
      headers: {
        'Content-Type': 'application/json',
      },
      // Body of the request is the JSON data we created above.
      body: JSONdata,
    }

    // Send the form data to our forms API on Vercel and get a response.
    const response = await fetch(endpoint, options)

    // Get the response data from server as JSON.
    // If server returns the name submitted, that means the form works.
    const result = await response.json()
    alert(`Is this your full name: ${result.data}`)
  }
  return (
    // We pass the event to the handleSubmit() function on submit.
    <form onSubmit={handleSubmit}>
      <label htmlFor="first">First Name</label>
      <input type="text" id="first" name="first" required />

      <label htmlFor="last">Last Name</label>
      <input type="text" id="last" name="last" required />

      <button type="submit">Submit</button>
    </form>
  )
}
It's a Next.js page with a React function component called PageWithJSbasedForm with a <form> element written in JSX. There's no action on the <form> element. Instead, we use the onSubmit event handler to send data to our {handleSubmit} function.
The handleSubmit() function processes your form data through a series of steps:
- The
event.preventDefault()stops the<form>element from refreshing the entire page. - We created a JavaScript object called
datawith thefirstandlastvalues from the form. - JSON is a language-agnostic data transfer format. So we use
JSON.stringify(data)to convert the data to JSON. - We then use
fetch()to send the data to our/api/formendpoint using JSON and HTTPPOSTmethod. - Server sends back a response with the name submitted. Woohoo! 🥳
Conclusion
This guide has covered the following:
- The basic HTML
formelement - Understanding forms with React.js
- Validating forms data with and without JavaScript
- Using Next.js API Routes to handle
reqandresfrom the client and server
For more details go through Next.js Learn Course.